Friday, June 25, 2010

It's Mad Hatter Tea Party Time Again

I heard a whisper through the grapevine that it's Party Time again, thanks to that wonderfully whacky hostess, Vanessa Valencia of A Fanciful Twist.


If you've fallen down the rabbit hole and found yourself here, you're in for a treat. I'm giving away a piece of my polymer clay hand-made jewelry. It's a piece that will complement any blue Alice frock.


The flower pendant is made from individual slices of petal and leaf polymer clay canes. The brass chain is embellished with pretty Alice-blue Swarovski crystals. The chain is 18" long.

All you need to do to qualify for this giveaway is to leave a comment on this post. The giveaway will end on July 15th, when I'll draw a name out of the Mad Hatter's Hat to pick the winner.


So I hope you've got your comfy shoes on for your trip around Blogland. Visit A Fanciful Twist for the list of party goers and have a sparklie good time!


copyright 2010 Shibori Girl

Monday, June 14, 2010

Tales of A Polymer Clay Addict...

... or how I worked through the pain.

Last week I was working hard to finish up some pieces, and felt this ominous pain in my left wrist. I woke up during that first night to an odd feeling of needles and pins in the back of my hand. Uh-oh. Being a self-diagnosing fool, I researched online and felt it was the beginnings of Carpal Tunnel Syndrome. Crap! I high-tailed it to the drugstore for a splint, thinking I could head this problem off at the pass and skip the doctor's office.

The brace worked like a charm: after three days, the pain was gone and I felt well enough to work again. But, for now, I'm taking things easy, doing stuff that doesn't require a lot of pinching or sanding. This seemed like a good time to do some R & D.

One of my issues with the polymer clay is that the colors available are kind of brassy and bright. I know from my fabric dyeing experiences that I really only need six colors: red, yellow, blue, white, black, brown. From those colors I can mix anything I want.


This Research & Development project took about an afternoon, and I barely needed my left hand at all. It was a good project to do. I set up a database on my computer for keeping track of formuli. I carefully divided blocks of clay into eighths, and started blending, keeping track of proportions. I baked color chips and labeled them on the back with the color name.


Easy peasy! I no longer need to feel frustrated that I can't reproduce a color from a previous project. Thanks to a little bit of work and some organization, I can get pretty darned close to what I want. Of course, this is going to be an ongoing event - I started very simply by doing a color wheel, and haven't experimented with brown or black much at all.

copyright 2010 Shibori Girl

Wednesday, June 09, 2010

Continuing the Studio Magic

Pumped up from last week's success, I continued with bead embroidery to finish a project planned long ago: one of my polymer clay cabachons from the "faux rock" series made this pretty pin.


I've been itching to add some fringe to a piece since learning bead embroidery, but up until this moment, the pieces have been complete without added fringe. This new pin was fine without it, but adding the fringe gave it a flirty quality that I like a lot. You can find more information about the pin in my Etsy shop listing.

I haven't really done much in the way of polymer clay work since returning home from vacation. To get my feet wet, I made a project just for me:


Making holes in clay can be a tricky business. If you do it while the clay is uncured, you risk distorting the shape as the needle tool pushes through the project. But, if you drill holes after you bake the piece, you risk breakage. Online research suggested I use hand drills. So, off I toddled to Lowe's to buy a set of drill bits. I made some handles from scrap clay decorated with cane slices. Now I can make holes easily in a controlled manner.
~~~
In the studio, Al Stewart's on the stereo - the stuff he's been playing while on tour with Dave Nachmanoff is wonderful. (Nachmnoff's guitar playing is some of the best I've ever heard.)

It's time to start making more of what sold during our trip. The leaf pod necklaces were very popular. These four are currently listed in my shop:


I have a pretty new pile of smaller leaf pods to use this week. I do enjoy making these beads! Many Thanks to Zuda Gay Pease for her short tutorial.


My newest clay pendants were also a huge hit. I've got three made and should have them listed early next week.


As you know, there's always something going on in my studio. Earrings are up next. Stay tuned...

copyright 2010 Shibori Girl

Tuesday, June 01, 2010

I Amaze Myself Sometimes

I mentioned in a previous post that I've grown accustomed to a feeling of dread halfway through a project... that gut reaction that makes me second-guess what I've done up to that point. I step back and wonder if I've just wrecked hours of work.


I've learned to accept this feeling is "part of my process". This need to re-evaluate.


I think there have been maybe two projects that I've really regretted, and those two pieces were ones where I told that Angel on my Shoulder to shut the Hell up. Turned out I should have listened.


This past week, I spent about 30 hours working up a new piece of bead embroidery. These pieces never end up how I envision them at the start. This one is no different.

Several months ago, I bought the central bead, and the 5 little round matching ones. They were so unusual - composite wood and resin. Lightweight. Beautiful.


At that time, I'd planned to do something with a tribal feel to it. I purchased seed beads in many graduated colors of golden yellow, tan, black, brown, and cream. This was going to be a color fiesta. On our recent trip, I picked up some fabulous vintage French brass and copper stampings, and a couple of those went into the initial supply tray as well.

I got started. It turned out that this piece didn't want to be a color fiesta after all. It wanted to be an understated neck collar... a contrast between simplicity of color and complexity of design. At the end of each step, I'd pull out some of those specially-bought-for-this-project seed beads. I'd stitch some down, only to hear that Angel tell me to rip it out. This piece only wanted black and tan, with just a HINT of gold.


Once again, I'm so glad I listened. She was right. This turned out to be my best neck collar so far.


I'll have it listed in my shop later today. For now, I just want to stare at it for a while and wonder, "did I really do that?"
~~
June 2, 2010
This collar is now listed for sale in my Etsy shop.


copyright 2010 Shibori Girl

Saturday, May 29, 2010

Back in the Studio

Now that our vacation is a fading memory, I'm back in my studio working on some polymer clay and beadweaving.


A few months ago, I made this first attempt at a polymer clay picture:


It was a good first attempt... I liked it. I kept it out on my worktable so I could work out the mental puzzle of how to use it.

I started by gluing the clay oval to some ultrasuede and beaded around it. Pretty!


A simple spiral rope with sterling silver end caps and clasp is the finishing touch.


I'm delighted with the finished result - bright Spring colors, and the toned-down browns of the rope balance it nicely.


This little beauty is currently listed for sale in my Etsy shop.

copyright 2010 Shibori Girl

Friday, May 21, 2010

Wanderlust Satisfied

Every few years, Marble Man and I get the itch to hop in the car and drive to some far-off point yet undiscovered by the two of us. When Pooch got so ill, we had to put that desire on the back burner because we couldn't travel together. Pooch has been gone a year now, and we spent the past couple of months planning our road trip. This was the challenge: we'd be gone 15 days, traveling in a two-seater convertible with a micro trunk. How to pack? We did it, but had to do laundry every three days.

My dear Uncle Tom requested a visit last year which we were unable to do. He was first on our list for this trip. We drove to Rochester, NY in time to see the lilacs in full bloom in Highland Park.... Gorgeous.


Since we were so close, we took a day trip to Niagara Falls. I was there as a teenager and Marble Man had never been, so it was a must-see destination.


Canadian Horseshoe Falls, Part 1


Canadian Horseshoe Falls, Part 2


American Falls (shot from Canadian side)

Man, that's a lot of water! This was surely the highlight of our trip.

The rest of our travels took place in the Northeast:
Poughkeepsie, NY
Riverton, CT
Scarsdale, NY
Hopewell, NJ
and we finished up in Philadelphia.

We visited many friends and family who haven't seen us in lots of years... it was great to see you all.

Since so many folks on our itinerary hadn't seen us in eons, I brought a box of my recent jewelry pieces to show. I had no idea I'd be selling pieces left and right! I feel like I littered the Northeast with sparklies. Now that Katie's Traveling Trunk Show is finished, I need to get into the studio to make more of everything. All the polymer cuff bracelets went, as did some of the clay tile bracelets and earrings, and more than half of my new polymer clay pendants! Thanks to everyone who bought pieces. I really did bring them just to show. :)


copyright 2010 Shibori Girl

Thursday, April 29, 2010

Polymer Clay Cuff... Take Two

Success!


After the Great Bracelet Debacle last week, I tried again and implemented my plan to add a layer of translucent clay BEFORE laying in the floral components. So much better - no air pockets. After baking, I glued the clay to the brass cuff. This was the first time I've ever used Super Glue, and I proceeded to glue my fingers together. Sheesh. My learning curve appears to be long and slow. *sigh*


I still had a bunch of sanding to do. I love the clay when it feels silky smooth, so I sanded like crazy to even out the overall surface. In the process, I sanded right through a wing of the butterfly. Crap! After stomping through the house for 30 minutes in a fit, I went to the studio to see what I could do to fix it. I baked another butterfly all by itself, then glued it over the damaged area of the bracelet. I left it as a bas relief and I like the final result.


Now a plea for ideas:

I'm stuck with this new pendant. I feel it needs something but can't figure out what. Maybe some metallic gold feathers between the bail and the top of the landscape motif?? What would YOU do with it?


I really do want ideas, so put your thinking caps on. :) Thanks!


copyright 2010 Shibori Girl

Saturday, April 24, 2010

Polymer Clay Landscapes Coming to Life

My adventures into the polymer clay medium continue with pendants being my focus for the past two weeks. I've been steadily creating flower canes since Christmas, collecting them in drawers, waiting until I have enough variety to let my imagined flower garden come to life in clay.


I started with a bracelet cuff.


I cut slices from my flower and leaf canes, trimmed away excess clay packed around petals, and laid them one-by-one onto a black background. Satisfied with the arrangement, I then cobbled translucent clay between the floral elements to fill in the spaces. My hope was to minimize sanding time after baking.


Once the bracelet was baked, I recognized my fairly serious mistake right away. Air pockets were trapped in the spaces between elements, and the black clay now looks purple. As well, there were dips and valleys where the added background clay met the flowers and leaves. Much sanding later, I have a (mostly) smooth bracelet, but those pesky air pockets are still there, preserved forever in clay.


I'll be keeping this bracelet. It's a pretty thing, and I enjoy it, but the flaws are too "in my face" to ever pass it onto a customer. Next time, I'll fuse a very thin layer of translucent clay to the background and then press the flower elements into that. Hopefully that will eliminate the air pocket issue altogether.

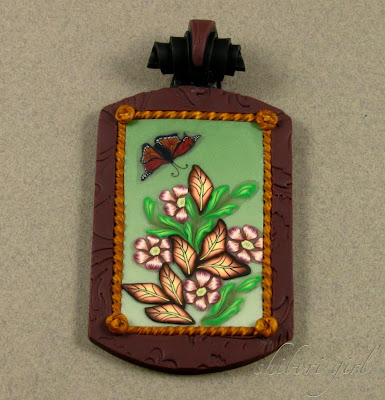
Meanwhile, after the Great Bracelet Debacle, I needed something to go right. I explored using these same flower and leaf canes to make "window" pendants.


They came out just as I'd hoped, like little paintings.


However, I can't seem to let well enough alone - I felt my new pendants needed a little something extra special. I've planned to try a butterfly cane ever since I saw one in Donna Kato's millefiore clay book. Time to stop talking about it and just do it. It was a monster cane and took nearly 5 hours to put together. At that point, I said "you're done! No more packing clay to make you round, just stay a triangle." After reducing this behemoth, the wings were distorted because of the triangular shape, but the color gradations were pretty amazing. I was very conflicted at this point: the perfectionist in me was pissed that I'd taken a short cut and not rounded the cane. But the clayer in me looked at the finished cane and shouted "AWESOME!"


The cane was very soft, even after resting in the freezer for a few minutes and slicing distorted the butterfly slices even flatter, but when I rolled the slice flat onto the pendant, it elongated again and looks nearly perfect. I don't even mind the slight blurring at the wing tips - makes me think it looks realistically in flight.


I am so happy with these little beauties!


I hope to have these listed in a few days in my Etsy shop. Keep an eye out for them.


copyright 2010 Shibori Girl

Friday, April 09, 2010

Polymer Clay "Swirlies"...

... no, not the swirlies some of us unfortunates received in Junior High School, but lovely lentil beads with swirled patterns on the surface.


After viewing photos on Flickr which featured some really stunning examples of this technique, I felt inspired to try it. The internet is rich with information and truly generous artists who are willing to share their knowledge. A video on You Tube demonstrates how to make a bicone using a sheet of acrylic, a table, and a round ball of clay. Very cool.


I tried it with a ball of plain clay, then added some design elements: four slices from a leaf cane and some trimmings of my sheet of gold-leaf- on-black clay.


I swirled away, and this was the result.


I liked it, but wished the design had made it's way out to the edges of the bead. I tried again, but used only three slices from the leaf cane.


MUuuuch better!

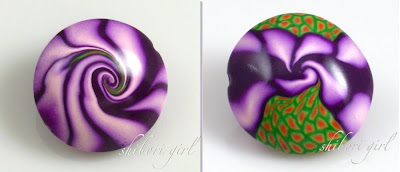
Some photos I'd seen were of bi-colored swirled beads and I tried to do that. I have a flower cane with nice color contrast: green and orange center with purple petals. I covered a ball of clay with two slices from this cane. The mistake I made was to place the ball on the table with the green center facing up. As I swirled, the green disappeared leaving only purple. Pretty, but not what I was after (bead on the left).


I tried again with the green area perpendicular to the table, and "voila!" I stopped swirling a little too soon with the bead on the right, but now I know how to get what I want.

I made some bead sets:


as well as some of the fun-and-funky variety:


These beauties make fabulous focal points for simple necklaces:


Click on above image to see the listing at Etsy

I'll be listing these for sale over the weekend.


Thanks for stopping by. :)

copyright 2010 Shibori Girl