Showing posts with label peyote stitch. Show all posts

Wednesday, December 16, 2009

Perseverence Pays Off... Again

You've probably figured out by now that I like to learn.

No, make that: I LOVE to learn. As I headed off to college, my Daddy told me that now I was going to learn how to learn... not just cram for tests and regurgitate knowledge into a blue book at the end of a semester. My task, from now on, was to teach myself how to learn so I'll be able to do it for the rest of my life. I'm so grateful for that lesson - it's been instrumental in shaping the way my life turned out.

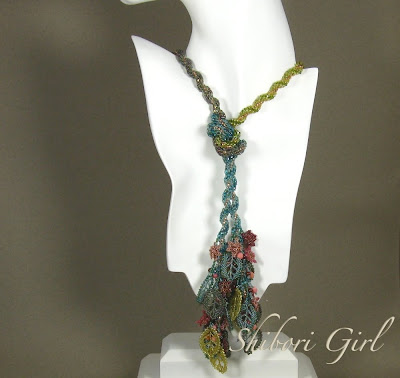
In my quest for knowledge, I came across this little gem by beader extraordinaire, Lisa Kan. As I flipped through the book,

I turned to this page and knew This Was IT - my new learning project. This gorgeous lariat is an exercise in patience and perseverance. Getting the hang of the peyote-stitched leaves and right-angle weave flowers was not so bad,

but there were so many of them in the finished piece!

Each individual leaf and flower took 30 minutes, and that was working as fast as my digits could move.

Then there was the time it took to add each one to the fringe...

I did change the spiral rope from a triple to a single.

The instructions said to do a triple spiral and make it 50 inches long. WHaaaattt? That's crazy talk! I tried the triple spiral at the start, and it took one hour to do a single inch. No way would anyone pay for that amount of time, no matter how gorgeous the finished piece is. So, I made it a a single, and shortened it to 39 inches. It's plenty long, and certainly gorgeous.
When I showed the finished lariat to friends, one suggested that the clustering of leaves and flowers in the fringe is very effective, but it's hard to see the individual parts. She thought I should spread them out a bit and let each piece shine. Always up for a challenge, I set out to do this.

Because the leaves and flowers take so long to make, I wanted to be sure to make only the amount needed. Marble Man suggested I draw up a design, something I don't normally like to do. In this case, it was a great idea.

I started with a sterling silver clasp in the shape of two leaves. I always like it when a clasp fits the theme of a piece.

Now that I've planned my work, it was time to "work my plan"... one tiny bead at a time.

We're talking size 15 seed beads here, folks. I broke out my special glasses and magnifier for this one!

The nature of peyote stitch is to have alternating beads poking out the sides of the work. This made a very neat finish as I "married" leaves next to each other and then zipped them up with thread.

The finished necklace turned out just as neat on the back as it did on the front.

Final count: close to 26 hours to complete.

Lacy, lightweight, and very elegant. I'm so happy with the way this turned out.

You can find both of these pieces listed for sale in my Etsy shop.

Now... what's next?

copyright 2009 Shibori Girl

Wednesday, October 28, 2009

It's Showtime!

I just learned I'll be participating in the United Church of Chapel Hill's annual Alternative Gift Market again this year. I did this show last year and had a wonderful time. The show is very short, just seven hours in a weekend, and a portion of the participants' income is collected for the church's designated charity for the year.

To prep for this year's event, I'm polishing up my displays and finishing up new work that's been in various stages of completion for a while. New this year are a variety of inexpensive necklaces - beaded charms strung on leather cords and priced at $32.50 and under.


Peyote stitched tube with beaded dangle $25.00
~


Peyote stitched panel with acrylic flower bead $27.50
~


Peyote stitched panels with crystal dangle $32.50
~


Peyote stitched tube with fringe $28.50

I'm hoping these new pieces will appeal to a wider audience. The only thing left for me to do with them is come up with an attractive way to package them. Oh, I do love a challenge!
~
Now to work on some bracelets


Tubular peyote stitched twisted bracelet $182.00

I've ordered a mess of supplies for some fun and fanciful earrings... pictures to come soon.

Thursday, July 16, 2009

Bending Mind (And Beads)

Now that I'm able to spend hours at a time in my studio, I am focused on learning more intricate beading techniques long-admired in beading magazines. One of those is the Dutch spiral, a version of peyote stitch but with a technical twist. This results in a wild and organic shape that is visually exciting.


Thanks to my mother's dear friend, Mikkey, an opportunity to learn the Dutch spiral fell into my lap. She sent a necklace kit for me to make up for her. Perfect! The beads were included, as well as wonderfully detailed instructions. I made my way through the pattern, row-by-row. It took me about 5 hours start to finish, which I think was pretty good time.


Now, I've made three more, using my own beads and I've whittled the time down to 4 hours. This first one came out quite knobbly because I experimented with bead size. In additional to #11 seed beads, I added #15's and #13 charlottes. Using such tiny components tightened up the spirals, which is interesting to look at, but I liked the gentler twists of the original necklace better.


This blue version went back to #11 seed beads, and I added some deep iridescent fringe beads, which poke out of the design. Wonderful textural interest there!


More experimenting with color here: Reds, lavender, brown, green, and gold.


The ends of the rat-tail cord are embellished with tubular peyote stitch "cuffs" and beautiful art-glass button closures.


The original pattern had the bead embellishment as individually stitched parallel circles of beads. I didn't love this finishing method - the rows didn't nestle together neatly, and it took much longer to do than the peyote stitched ones I did later on.

These three necklaces are available through my Etsy shop - click on the pictures to view the individual listings. I'm hoping these will take off as they are a lot of fun to make!

Working with this new technique had me singing this fantastic song by Lambert, Hendricks, and Ross as I stitched...


As I watched this, I wondered, "So WHEN does she get to take a breath?!?" Amazing phrasing there...

Tuesday, July 07, 2009

Focusing on Finishing

I'm in a beadweaving frame of mind. Now that I've finished Mikkey's amulet bag, I feel quite free to work on some inspirational pieces. My time is spent in the studio, wearing my work station close-up glasses and under the magnifier as I peer at tiny seed beads. The first piece finished last week was this necklace based on the one featured on the cover of the February 2009 issue of Bead & Button Magazine and designed by Marcia DeCoster:


This was a great instructional project. I learned a new way to do decreasing flat peyote stitch, as well as Ndebele (en-DEB-el-AH), or tubular herringbone, stitch. I've also been itching to practice encasing focal beads with peyote stitch bezels. This one turned out to be a beauty.


The central stone is agatized fossil coral, surrounded with cafe au lait-colored faux pearls and keishi pearls. The drop is peach-colored cubic zirconium. I'm very pleased with the final result. The beads were stitched down to a peyote stitch base, which made a nice, elegant finish.

The necklace rope called for twisted Ndebele.


The final product looks like individual strands of seed beads that were twisted before wearing, but the pattern is woven into a permanently twisted design. The wearer never has to think about pre-twisting before donning the necklace. Sweet! The connecting loops were made with straight Ndebele. The finishing touch is a sterling silver box clasp with a purple glass cabachon.


There was a lot to learn, and lots of practice with each component of the piece. There was also a lot of undoing mistakes!


This is going into my personal collection.
~~~
The other piece I finished was my own design.


A spectacular moukite oval bead is the focal point, with a deep, rusty red background and ribbons of yellow, cream, gray, and lavender running through it. The stone is surrounded by a seed bead bezel embellished with micro-faceted sunstone rondelles and keishi pearls. The beads are stitched to a soft, eggplant purple Ultrasuede background fabric - something else I've been wanting to learn for a very long time.


The rope from which the pendant hangs was woven with the twisted Ndebele stitch. The rope colors are a deep cherry red accented with a line of metallic beads ranging from deep gold to purple. The ends of the necklace are embellished with hand stitched beaded bead caps, moukite round beads, and Czech fire-polished crystal beads.


Those beaded bead caps were F - U - N, fun!


Purchasing information for this piece can be found here.

Tuesday, June 30, 2009

Perserverance Pays Off

The Tea Party is over: the cups are washed and put away, glitter and crumbs swept up, and life goes back to normal. I picked up where I left off with Mikkey's beaded amulet bag and finished it yesterday.

This was the mother-of-all-beaded-projects for me so far and here's how it progressed since my last update:

I finished the cylinder section of the bag and then went to the directions to find the next step. This wasn't hard, since the instructions were fairly terse:


"2. Work bottom and close." Well - not too helpful! HOW do I work the bottom? What is it supposed to look like? Is that little strip of blue at the bottom of the color map supposed to be the bottom? Or are they supposed to be flaps that hang down behind the bag with fringe attached to them, like the front flap diagrammed between them? Where is it written down?


I finally shouted "S**T" to the skies and headed to the bead shop for some help. I've heard rumors of a peyote stitch expert who works there, and maybe SHE could give me some direction... I showed her the pattern, the bag itself, and the kit directions. She stared at it for a good long while and said, "Huh!" She'd never seen such poorly written instructions before. After banging our heads together for several minutes, she pretty much said that however I decided to finish off the bottom was going to be right. OK.

So, I went home and figured out how many stitches and rows were in those two little patches of blue at the bottom of the color map. Maybe, they weren't supposed to be TWO flaps, but one joined in the middle behind the front flap? Sure enough, after making it up, this flap was JUST big enough to fill the bottom area. I stitched it closed with a huge sigh of relief.


The next step, the triangular flap at the bottom front, required some research - I hadn't learned to do decreases at the edge of peyote stitch yet. Easy peasy! I worked the flap and added it to the center front of the bag.

The fringe was also easy, just time consuming. Three down...


forty-seven to go!!


The strap was the final step, and required some patience. The words on it read:

"... and from the sea rose Venus, Goddess of Love, the brightest star in the infinite sky." ABCDEFGHIJKLMNOPQRSTUVWXYZ

I did take some liberties with the strap. By the time I got close to the end of the alphabet, the strap was REALLY long. Then I saw there were TWO "X's" as well as several punctuation marks after the letters in the diagram. I'm not a fan of redundancy, especially when my eyes are at stake. So, I left out the second X and those punctuations.

I tried on the bag, and the top hung even with my navel! With the added characters in the strap, it would have hung like a sporran in front of a kilt.

At any rate, it's done, and I'm happy with the result:


With all the fringe, it's fairly heavy, a little over four ounces. I think having the fringe run all around the front flap and the back at the bottom was unnecessary. But, it is very lush to look at.

~~~
What I learned from this project:

I know I can do something really difficult if I'm patient and ask for help.

I know I could write better directions! One simple line drawing diagram of how the bottom should look would have been a huge help. Even an additional photo of the back would be been a good idea.

After peering at the complicated pattern diagram, then switching to peering at tiny Delica seed beads, I fear I need a pair of these.

I prefer to see Botticelli's on the wall here.

Time to let out a deep breathe, pack the bag up and mail it out, then go onto something new...

Tuesday, June 23, 2009

Beaded Bag Progress

After I posted this, I knuckled down and got to work on Mikkey's "Venus" amulet bag. The first few rows were a complete nightmare. I had trouble reading the pattern - there are so many rows, and the peyote stitch creates half-step rows to make things worse. I remembered a magnet board I used when I did cross stitch many years ago. I dug that out, and it made life so much easier! By late Saturday night, I'd reached this point:


After I finish a row, I skootch the magnet bars up about 1/8 of inch to line up with the next row. Be very careful! Too far, and you've got a mess!

I always work a little faster when facial features start appearing - the piece starts to come alive for me then. This is where I am with it right now:


There's been a great deal of experimentation with my work environment during this project. The intricate pattern requires total involvement: body and brain. Any less, and mistakes start to happen, which means the household swear jar gets an infusion of quarters.

I've tried silence, but then I talk out loud to myself as I count the bead sequence for each row - very wearing. I found my mind wandering every couple of rows and I'd go get a snack, walk to the mailbox, read some email, not really wanting to go back to work.

Next I tried some instrumental music and found it works for this setting. My favorite: Ottmar Liebert and his Luna Negra band. Here's a little sample of his phenomenal classical guitar work:


It's a pleasant background, and surprisingly, the repetitive nature of it keeps me focused. Then, every four or five rows, my back and shoulders cramp up and my brain freezes. I switch over to some Billy Idol. It gives me a chance to get up and dance around my studio like a crazy person. Ahhh, now I'm loosened up and can get back to work. BUT, before I can get up, I need to leave all sorts of notes to myself reminding me of where I am in the project. If I don't, I get hopelessly lost.


I'm very nearly done with the main cylinder of the bag. Once that's done, I need to go to my local bead emporium for some lessons on the next step. The pattern designer assumed a great deal of knowledge on the part of the beader - just a reminder for me that I've overstepped my skill level this time.

Stay tuned...