My favorite time of this season is when we trim the Christmas tree. Long ago, we decided to forgo the delicious (and expensive!) smell of fresh pine for a fake tree. It was the year we spent $60 for a 5 foot tall fresh pine: the week after Christmas, our tree was at the curb awaiting pickup, and I went to our local hardware store on an errand. They had 7 foot tall fake trees for $70!! So, I bought one, and we haven't regretted it (much). It's easy to store, easy to decorate, easy on the environment, and it paid for itself the first year we had it.
22 years ago, I found a wonderful article in the 1986 December issue of McCall's Needlework & Craft Magazine with instructions for making bread clay tree ornaments. I made some, and one of my joys each Christmas is pulling them out of storage to hang on the tree.
They weren't difficult to make, just took some time and patience. I thought I'd post the instructions here if any one would like to try to make some. (If you want the printed instructions, email me and I'll send them to you.)
Here's what you'll need to make an angel with a rose bouquet:
Materials:
Old Fashioned White Bread (Wonder Bread works great!)
Aleene's Tacky Glue
White watercolor paint
food coloring: red and green
Acrylic paints: metallic gold, light blue, yellow oxide, red
polyurethane varnish
Equipment:
Please note, the collected things in this picture are the tools I've amassed over the years. You don't have to have ALL this stuff!
small mixing bowl and spoon
measuring spoons
plastic wrap
waxed paper or parchment paper
ruler
plastic straws
saucer or palette (for paints)
small and very fine paint brushes
small spool of fine wire (24 or 26 gauge)
wire cutters
Bread clay:
1 slice fresh white bread, crusts removed
2 tsp Aleene's Tacky Glue
1) break the bread into tiny pieces in small bowl
2) add glue
3) mix thoroughly with a spoon
4) knead mixture until it has a smooth and even texture - about 5 minutes.
(Note: it is VERY sticky! You'll have to rinse it off your hands after you start kneading, otherwise it will just keep sticking to itself on your fingers. It will start to behave itself after a minute or so of kneading.)
**Note: This clay dries out super fast, so only mix up enough for what you are doing at the time - the above recipe makes enough clay for one ornament.
Cover your workspace with waxed, or parchment, paper and tape it down.
Break off a small piece, about an inch round, and set it aside, wrapped in plastic wrap.
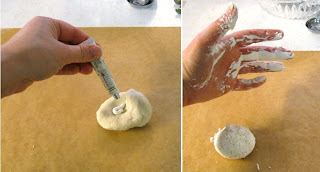
Now, make a well in the center of the main portion of clay and add about 2 tsp of white watercolor paint. Knead this until the paint is homogenized throughout the clay. This will be a big mess in your hands! Those of you who watched the Fellowship of the Ring movies will immediately start thinking of the "White Hand of Saruman". (I know, that probably makes me a geek!)
Once again, wash your hands and knead the clay against your workspace to evenly distribute the color.
Body:
When the clay is nice and smooth, make a cone of clay 2" long and about 5/8" thick at the base. Flatten out the cone with your hand to a 1/4" thick wedge, and sharply bend up the skinny end to form the upper body:
After the basic shape is done, you can embellish the surface of her gown any way you wish. To make the heart-shaped design, I wrapped one end of a large drinking straw with a rubber band to form the heart shape. You could also use leather stamping tools, or anything else that excites you.
Head and Wings:
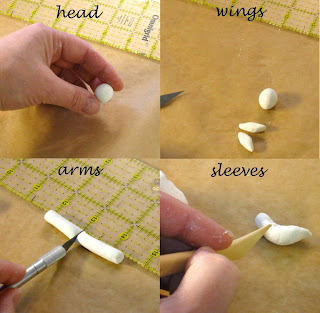
Break off a small piece of clay and model an oval about 1/2" long and attach to the neck using the same glue you used to make the clay. For the halo, flatten a pea-sized piece of clay to a circle 1/8" thick and glue to the back of the head.
For the wings, model a pair about 1/8" thick. Attach to body at the waist.
Arms:
Model two arms, about 1" long and 1/4" wide. Pinch at one end to form the hands and bend the hands so they are flat (to hold the bouquet). Add a graceful bend at the elbows. Score horizontal lines on the arms to add texture to the "sleeves" of her gown.
Assembly:
From a 1-1/2" piece of wire, form a loop, spread the ends and insert in between the wings below the waist. Glue the arms at the waist, pinching the hands together at the front.
Form two shoes from 1/8" long pieces of clay and glue behind the hem of her skirt.
Bouquet:
Now's the time for that little piece of clay you set aside at the beginning. Take a small piece and make a well as before. Add A LITTLE red food coloring and mix it well, kneading the color in evenly. Add more food coloring for a darker red.
Into another small piece, mix in some green food coloring.
The Base:
With a tiny piece of green, make a very thin circle of clay, about 1/4" in diameter.
Leaves:
Again with tiny pieces of the green clay, make 4 small, flat triangular pieces to form leaves. glue them to the edge of the base, and curve them to add dimension.
Flowers:
With the pink clay, roll out a small piece to be about 1/16" wide and then flatten it to a narrow ribbon shape. Start at one end and roll up the ribbon until your flower is the size you like, and cut off the excess. Make 4 roses, and attach to the base above the leaves. Dry separately from the angel and glue on later.
Now you have to be patient and wait for her to dry completely, about 48 hours. Set her aside in a warm, dry place, and periodically turn her to expose all surfaces to the air. You can speed up the process a little by keeping her in a slow oven, about 200-250 degrees. Keep checking on her to make sure all her parts dry completely.
When dry, it's time to embellish with paints. For the face: Using a very sharp pencil, or a fine tipped pen, draw fine lines for the nose and eyebrows. With a fine brush, paint the eyes blue, mouth and cheeks pale pink (dilute the paints for the face with a little water to make the colors translucent). Paint the hair yellow oxide, and add fine metallic gold dots to the halo.
Paint the wings metallic gold, and the shoes red or pink.
Finally, glue the bouquet to the hands. Brush on two light coats of varnish, allowing it to dry thoroughly between coats. Then, hang her on the tree, step back, and admire! Congratulations!
I have to say, I really enjoyed revisiting this project. It's nice to be reminded of how much fun it is to do something completely different. I'm sure I'll be doing more with it.
What do YOU do to get in the Christmas mood?
Subscribe to:
Post Comments (Atom)


10 comments:
Oh Kate, your tree looks wonderful and I love the handmade ornaments, thanks for the recipe!!
Terri
Hello Kate,
These ornaments are fantastic!
~ Gabriela ~
WOW! that is one FANTASTIC tutorial! thanks so much for sharing ... and your tree is a stunner. :)
usually, baking & making ornies get me in the mood, but this year I am SO far behind that the holiday feels like it's sneaking up on me ... ug. who knows, maybe this weekend I can work on making that change. :)
I picked up a new tree. My favorite store is having a 50% off on everything in the store to stimulate spending. I picked up a $300 for $150. It is a Rocky Mountain Slim and my son and I love it. My son keeps mentioning what a Charlie Brown tree we've had the last few years.
To get me in the mood and keep me in it is to decorate and then enjoy the twinkling lights whenever I'm home. I also enjoy playing Christmas music.
What precious ornaments. I'm a fan of handmade decorations. What details you share. Many thanks!
Looks lovely!
Such dedication!
OH MY GOSH, you are so talented!!!
I love your tree, I can't wait to get ours up. We get a real one, so I have to wait so it won't die on us before Christmas, though I am SOOOO tempted to get a fake one for that reason alone!
The ornaments are fantastic, you are so good and patient, my word!!! I might have to give those a try next year..this year is tooo crazy.
Great tutorial Kate! Your angel is SO PRETTY!!! Just gorgeous! I like all three angels but the one you feature is my fav. You tree looks great too!
Happy Monday!
xox
Constance
oooohhhh
yes,
as constance said--->
you give the best tutorials!
:-)
{{ are you featured on youTube? }}
Kate, this is the most incredible blog I've ever seen...could spend all day browsing. Thanks so much for the wonderful glue/bread recipe and instructions. I had made them years ago and forgotten. What a wonderful magazine that was. I would really love a copy of that article. How do I find your email address?
Thank you again for a beautiful site.
Wow, that post brought back memories! We made wonder bread roses when we were kids! So fun!
Post a Comment