Tuesday, June 30, 2009

Perserverance Pays Off

The Tea Party is over: the cups are washed and put away, glitter and crumbs swept up, and life goes back to normal. I picked up where I left off with Mikkey's beaded amulet bag and finished it yesterday.

This was the mother-of-all-beaded-projects for me so far and here's how it progressed since my last update:

I finished the cylinder section of the bag and then went to the directions to find the next step. This wasn't hard, since the instructions were fairly terse:


"2. Work bottom and close." Well - not too helpful! HOW do I work the bottom? What is it supposed to look like? Is that little strip of blue at the bottom of the color map supposed to be the bottom? Or are they supposed to be flaps that hang down behind the bag with fringe attached to them, like the front flap diagrammed between them? Where is it written down?


I finally shouted "S**T" to the skies and headed to the bead shop for some help. I've heard rumors of a peyote stitch expert who works there, and maybe SHE could give me some direction... I showed her the pattern, the bag itself, and the kit directions. She stared at it for a good long while and said, "Huh!" She'd never seen such poorly written instructions before. After banging our heads together for several minutes, she pretty much said that however I decided to finish off the bottom was going to be right. OK.

So, I went home and figured out how many stitches and rows were in those two little patches of blue at the bottom of the color map. Maybe, they weren't supposed to be TWO flaps, but one joined in the middle behind the front flap? Sure enough, after making it up, this flap was JUST big enough to fill the bottom area. I stitched it closed with a huge sigh of relief.


The next step, the triangular flap at the bottom front, required some research - I hadn't learned to do decreases at the edge of peyote stitch yet. Easy peasy! I worked the flap and added it to the center front of the bag.

The fringe was also easy, just time consuming. Three down...


forty-seven to go!!


The strap was the final step, and required some patience. The words on it read:

"... and from the sea rose Venus, Goddess of Love, the brightest star in the infinite sky." ABCDEFGHIJKLMNOPQRSTUVWXYZ

I did take some liberties with the strap. By the time I got close to the end of the alphabet, the strap was REALLY long. Then I saw there were TWO "X's" as well as several punctuation marks after the letters in the diagram. I'm not a fan of redundancy, especially when my eyes are at stake. So, I left out the second X and those punctuations.

I tried on the bag, and the top hung even with my navel! With the added characters in the strap, it would have hung like a sporran in front of a kilt.

At any rate, it's done, and I'm happy with the result:


With all the fringe, it's fairly heavy, a little over four ounces. I think having the fringe run all around the front flap and the back at the bottom was unnecessary. But, it is very lush to look at.

~~~
What I learned from this project:

I know I can do something really difficult if I'm patient and ask for help.

I know I could write better directions! One simple line drawing diagram of how the bottom should look would have been a huge help. Even an additional photo of the back would be been a good idea.

After peering at the complicated pattern diagram, then switching to peering at tiny Delica seed beads, I fear I need a pair of these.

I prefer to see Botticelli's on the wall here.

Time to let out a deep breathe, pack the bag up and mail it out, then go onto something new...

Sunday, June 28, 2009

What's Cooking Sunday / Fra Diavolo Sauce and Pasta

Oh my, that was quite a party yesterday here in Bloglandia. Thank you, Vanessa, for being such a charming hostess and introducing us all to each other. It's going to take some time to make my way around the room, so please be patient with me.
~
While getting ready for yesterday's party post, last week I worked most of each day right up until dinner time. I was so tired on Wednesday, especially, that all I could think of making was this simple and delicious pasta dish.


Fra Diavolo Sauce and Pasta

serves 4

4 T olive oil, divided
6 cloves garlic, crushed
1 (28 oz) can diced tomatoes with liquid
1 1/2 tsp salt
1/2 - 1 tsp crushed red pepper flakes
6 oz linguine pasta
8 oz small shrimp, peeled and deveined
8 oz bay scallops
1 oz chopped fresh parsley
1 T chopped fresh basil
Parmesan cheese (optional)

In large saucepan, heat 2 T olive oil with the garlic over medium heat. When the garlic starts to sizzle, pour in the tomatoes. Season with salt and red pepper. Bring to a boil. Lower the heat, and simmer for 30 minutes, stirring occasionally.

Meanwhile, bring a large pot of lightly salted water to a boil. Cook pasta according to directions and drain.


In large skillet, heat the remaining 2 T olive oil over high heat. Add the seafood. Cook for about 2 minutes, stirring frequently, or until the shrimp turn pink. Add to the tomato mixture, and add the fresh herbs. Cook until the sauce just begins to bubble, about 2 minutes. Serve sauce over pasta and sprinkle with Parmesan cheese, if desired.


**Note: I used a 12 oz bag frozen uncooked shrimp and half a bag of frozen seafood mix from Trader Joe's which had calamari, shrimp, and bay scallops. I thawed the seafood and drained it well before sauteing. The squid was a particularly nice addition.

I started with 1/2 tsp pepper flakes - I just had this feeling that 1 whole tsp would wind up being atomic. But, if you are a strong soul, go for it!

I also didn't have any linguine on hand, so used rotelli, and it was just great.

Friday, June 26, 2009

A Magical Mystery Tour

This morning, as I walked outside, I spied The White Rabbit in my front yard. Resplendent in a fancy jacket and with a wicked twinkle in his eye, he told me he was rounding up the guests for Vanessa Valencia’s Mad Hatter Tea Party.


“But, how will I ever get to that magical land called A Fanciful Twist” I asked? It’s a legendary spot, but nowhere to be found on a map.

The rabbit got very close, and whispered, “look over there”.


Nestled in the grass was this:


What? Vanessa sent a Mad Hat? Such a clever hostess! I peeked underneath the hat, and there was a rabbit hole.


I stepped in and…


I landed with a thud and a light bounce. "Ooof!" Wandering to the end of the rabbit tunnel, I found the door to A Fanciful Twist. But, being a magical door, it was too big – I couldn’t reach the door handle!


A plate of cupcakes topped with mountains of magic frosting (and instructions) sat by the door.


Being magic cupcakes, they will always be your favorite flavor. “Mmmm… mine’s red velvet!”


Aw fowt m'sewf gwah-ing tower... "Pardon me!" How rude... speaking with my mouth full like that! Let me try that again:

I felt myself growing taller with each bite. I easily reached the door and stepped through.... There was Vanessa's marvelous garden gate:


Image provided by A Fanciful Twist

Park your tricycles outside the gate and walk through for a Sparkly Good Time. With any luck, He’ll be there…

Be sure to follow me down the rabbit hole to A Fanciful Twist. You don't want to miss the Fabulous Soiree she's got going on over there. You'll find the list of party guests in her sidebar.

Thursday, June 25, 2009

"Oh, My Ears and Whiskers!..."

"I'm so very late", said the White Rabbit.

I've been so caught up in my beading that I completely lost sight of the fact that Vanessa's party is THIS Saturday!!! Oh, dear... and I haven't done a thing to prepare yet. I've got some plans in my head, but getting them into the computer is a different story altogether.

I've put this aside for today and have knuckled down at my drawing board to lay in the structure of my party post. I'll leave you with a little taste of what you'll find when you come back on Saturday:

"Party on, Dudes!"

I do hope you'll come by for the sparkly festivities. Last year's event was a Thing To Behold. Such revelries, and so many blog buddies made...

Tuesday, June 23, 2009

Beaded Bag Progress

After I posted this, I knuckled down and got to work on Mikkey's "Venus" amulet bag. The first few rows were a complete nightmare. I had trouble reading the pattern - there are so many rows, and the peyote stitch creates half-step rows to make things worse. I remembered a magnet board I used when I did cross stitch many years ago. I dug that out, and it made life so much easier! By late Saturday night, I'd reached this point:


After I finish a row, I skootch the magnet bars up about 1/8 of inch to line up with the next row. Be very careful! Too far, and you've got a mess!

I always work a little faster when facial features start appearing - the piece starts to come alive for me then. This is where I am with it right now:


There's been a great deal of experimentation with my work environment during this project. The intricate pattern requires total involvement: body and brain. Any less, and mistakes start to happen, which means the household swear jar gets an infusion of quarters.

I've tried silence, but then I talk out loud to myself as I count the bead sequence for each row - very wearing. I found my mind wandering every couple of rows and I'd go get a snack, walk to the mailbox, read some email, not really wanting to go back to work.

Next I tried some instrumental music and found it works for this setting. My favorite: Ottmar Liebert and his Luna Negra band. Here's a little sample of his phenomenal classical guitar work:


It's a pleasant background, and surprisingly, the repetitive nature of it keeps me focused. Then, every four or five rows, my back and shoulders cramp up and my brain freezes. I switch over to some Billy Idol. It gives me a chance to get up and dance around my studio like a crazy person. Ahhh, now I'm loosened up and can get back to work. BUT, before I can get up, I need to leave all sorts of notes to myself reminding me of where I am in the project. If I don't, I get hopelessly lost.


I'm very nearly done with the main cylinder of the bag. Once that's done, I need to go to my local bead emporium for some lessons on the next step. The pattern designer assumed a great deal of knowledge on the part of the beader - just a reminder for me that I've overstepped my skill level this time.

Stay tuned...

Sunday, June 21, 2009

What's Cooking Sunday / Ginger-Soy Broiled Salmon

When I've been working hard all day, I barely want to think about what's for dinner - and I've also usually left the decision to the very last minute. At these times, simplicity is best, and I love a recipe that seems to cook itself!


Ginger-Soy Broiled Salmon
Serves 4

Marinade:

2 T low sodium soy sauce
2 T lemon juice
2-3 cloves garlic, minced
1 T freshly grated ginger
1/4 C olive oil

4 (6 oz) salmon fillets

Combine marinade ingredients in a glass baking dish and add fish pieces. Cover well and place in fridge for an hour, turning once.

Move fish to a foil-lined cookie sheet and broil until cooked through.

Friday, June 19, 2009

The Peter Principle Proving True

My mother's friend, Mikkey, is moving house.


While packing up, she found some beading projects she's decided she'll never get around to doing. In a great move of generosity she's passed them to me. The one she really hopes I'll do for her is a little peyote stitch amulet bag by designer, Ann (Paxton) Winebrenner. I've gotten quite comfortable with tubular peyote stitch now, so I thought I'd try this pretty project.

The kit came neatly packaged up in a small tube:


If it all fits into this little package, how complicated can it be, right? I emptied the tube to assess the contents, and....


.... "Holy s**t-pile of beads, Batman!" There were long tubes, short tubes, and itty bitty ziploc baggies of seed beads. And there were color charts mapping the design.


*gulps and repeats to herself:* "OK, I can do this, I can do this..." One baby bead at a time. I think this is going to be a long-haul enterprise, but I'll give it my best.


I'm all for trying something just beyond my current skill set, but this is a BIG reach. Thanks for the challenge, Mikkey! And safe travels...

Tuesday, June 16, 2009

"Indoor Gardening" and Sun Protection


Last Sunday was a bright, shiny day and Marble Man and I went driving in our favorite toy. It was soon obvious that if I'm going to spend any amount of time on the road, I need something to shade myself or I'll be a crispy critter by Summer's end. Especially with an upcoming 10 hour road trip planned to the Jersey Shore.
~
My studio is filled with supplies gathered for Projects Past: pretty fabrics that caught my fancy, ribbons and trims, and hats. Hats... PERFECT!


I dimly remembered a straw hat with grommets and a scarf tie somewhere in the closet depths. I dug around and found it: a hideous $3.88 Walmart purchase. Seriously. It put the "Ugh!" in ugly with rough raw edges and a cheap poly/cotton tie - a plain Jane thing just crying out for prettying up. Which, of course, was why I bought it all those years ago...


My favorite books for hats and ribbon embellishments...


~
First step: make a scarf from some pretty polyester fabric I'd bought years ago. I plan to make a blouse from the bulk of this, but felt I could spare a quarter yard for the Great Hat Rescue Project.


I'd originally planned to use one of my shibori silk scarves, but all the sun exposure this hat's going to get will rot the silk. Which would be a real shame. This stash fabric I have is a polyester chiffon with a sheer and silky quality - a worthy "Plan B".
~
But now, what to do about that rough and scratchy brim? I gathered up some peach colored vintage wired ribbon - just pull on the fine copper wires to make the gathers. I pinned it around the hat brim to enclose that rough edge and stitched it down. In another box, I found some soutache passementerie braiding in the same pink as the fabric background. I machine-stitched the soutache over the ribbon to cover the messy looking gathered edge. Beautiful! And, "ahhhhh" - no more scratches and getting caught on my clothing or seat belt.


The final touch was to stitch on the ribbon flowers and leaves by hand. I stitched them down pretty flat so they won't come off while I'm wearing it. The little car demands we drive like a bat out of Hell, and I don't want to feel the flowers pinging off my hat as we go!


I'm generally not a big fan of hats that tie under the chin, but I think I'll be a happy girl while wearing this new-and-improved chapeau:


"And a-wayyyy we go...!"

Sunday, June 14, 2009

What's Cooking Sunday / Chocolate-Apricot Bars

I guess you've figured out by now that I've got a bit of a sweet tooth... OK, maybe more than one! That's why I'm on a perpetual diet. Thankfully, Weight Watchers realizes that most of their clients have at least one sweet tooth, and have come up with some recipes to satisfy without breaking the caloric budget. This recipe for Chocolate-Apricot Bars is one of my favorites:


Chocolate-Apricot Bars
Serves 12

Preheat oven to 350 degrees

1.5 C all purpose flour
3 oz (1 C) uncooked quick oats
1/4 C firmly packed light brown sugar
Pinch salt
1/2 C reduced calorie tub margarine, well chilled (I use Smart Balance)
2 T chilled water
3/4 C apricot spreadable fruit
2 oz semisweet chocolate chips

Spray a 9" baking pan with nonstick cooking spray.

In medium bowl, combine flour, oats, brown sugar and salt. With pastry blender (or 2 knives), cut in margarine and water until mixture is a crumbly dough. Press dough into prepared pan. Bake 25-30 minutes until golden.

Evenly top bar mixture with spreadable fruit and bake 15 minutes. Allow to cool.

Meanwhile, melt chocolate in microwave oven on High for 90 seconds, stirring halfway through cooking time. Or, you can use a double boiler on the stove top. Evenly drizzle the chocolate over the cooled apricot bar mixture. Cool completely, then cut into 12 equal squares.


Each Serving Provides:

200 calories
3 g Protein
6 g Fat
25 g Carbohydrate
87 mgs Sodium
0 mgs Cholesterol
1 g Dietary Fiber

Thursday, June 11, 2009

Problem Solved!

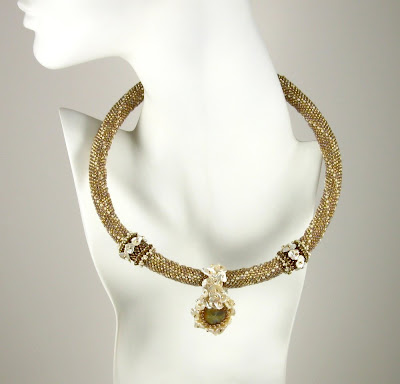
After you all piped up with suggestions for how I could fix my necklace (thank you!), I spent last night wracking my brain trying to figure it out. I went online to chat rooms and pored over the magazines on my studio shelves. I stared at the necklace, daring it to fix itself. Then, around 3 AM, I had my "Aha!" light bulb moment.

I remembered reading somewhere about a peyote stitched necklace worked around a coated electrical wire to make a flexible piece that would hold it's shape. Hazzah! I ran down to Lowe's with the unfinished necklace this morning. Much to the amusement of some hunky contractors, I stood in the electrical aisle testing out various thicknesses of wires available for sale by the foot. Turns out, #8AWG was perfect!

I finished the project this afternoon, and I am very happy with the final result. I inserted the wire and stitched the tube closed. Then, I curved the wire to meet at the back, and it worked! The bead work flexed around the wire and didn't kink or crease. Sweet!


The wire is going to take some getting used to - it's fairly stiff and so has some "spring" to it. The necklace, instead of draping, feels like a loose collar.


Different, yet lovely...