Thursday, April 29, 2010

Polymer Clay Cuff... Take Two

Success!


After the Great Bracelet Debacle last week, I tried again and implemented my plan to add a layer of translucent clay BEFORE laying in the floral components. So much better - no air pockets. After baking, I glued the clay to the brass cuff. This was the first time I've ever used Super Glue, and I proceeded to glue my fingers together. Sheesh. My learning curve appears to be long and slow. *sigh*


I still had a bunch of sanding to do. I love the clay when it feels silky smooth, so I sanded like crazy to even out the overall surface. In the process, I sanded right through a wing of the butterfly. Crap! After stomping through the house for 30 minutes in a fit, I went to the studio to see what I could do to fix it. I baked another butterfly all by itself, then glued it over the damaged area of the bracelet. I left it as a bas relief and I like the final result.


Now a plea for ideas:

I'm stuck with this new pendant. I feel it needs something but can't figure out what. Maybe some metallic gold feathers between the bail and the top of the landscape motif?? What would YOU do with it?


I really do want ideas, so put your thinking caps on. :) Thanks!


copyright 2010 Shibori Girl

Saturday, April 24, 2010

Polymer Clay Landscapes Coming to Life

My adventures into the polymer clay medium continue with pendants being my focus for the past two weeks. I've been steadily creating flower canes since Christmas, collecting them in drawers, waiting until I have enough variety to let my imagined flower garden come to life in clay.


I started with a bracelet cuff.


I cut slices from my flower and leaf canes, trimmed away excess clay packed around petals, and laid them one-by-one onto a black background. Satisfied with the arrangement, I then cobbled translucent clay between the floral elements to fill in the spaces. My hope was to minimize sanding time after baking.


Once the bracelet was baked, I recognized my fairly serious mistake right away. Air pockets were trapped in the spaces between elements, and the black clay now looks purple. As well, there were dips and valleys where the added background clay met the flowers and leaves. Much sanding later, I have a (mostly) smooth bracelet, but those pesky air pockets are still there, preserved forever in clay.


I'll be keeping this bracelet. It's a pretty thing, and I enjoy it, but the flaws are too "in my face" to ever pass it onto a customer. Next time, I'll fuse a very thin layer of translucent clay to the background and then press the flower elements into that. Hopefully that will eliminate the air pocket issue altogether.

Meanwhile, after the Great Bracelet Debacle, I needed something to go right. I explored using these same flower and leaf canes to make "window" pendants.


They came out just as I'd hoped, like little paintings.


However, I can't seem to let well enough alone - I felt my new pendants needed a little something extra special. I've planned to try a butterfly cane ever since I saw one in Donna Kato's millefiore clay book. Time to stop talking about it and just do it. It was a monster cane and took nearly 5 hours to put together. At that point, I said "you're done! No more packing clay to make you round, just stay a triangle." After reducing this behemoth, the wings were distorted because of the triangular shape, but the color gradations were pretty amazing. I was very conflicted at this point: the perfectionist in me was pissed that I'd taken a short cut and not rounded the cane. But the clayer in me looked at the finished cane and shouted "AWESOME!"


The cane was very soft, even after resting in the freezer for a few minutes and slicing distorted the butterfly slices even flatter, but when I rolled the slice flat onto the pendant, it elongated again and looks nearly perfect. I don't even mind the slight blurring at the wing tips - makes me think it looks realistically in flight.


I am so happy with these little beauties!


I hope to have these listed in a few days in my Etsy shop. Keep an eye out for them.


copyright 2010 Shibori Girl

Friday, April 09, 2010

Polymer Clay "Swirlies"...

... no, not the swirlies some of us unfortunates received in Junior High School, but lovely lentil beads with swirled patterns on the surface.


After viewing photos on Flickr which featured some really stunning examples of this technique, I felt inspired to try it. The internet is rich with information and truly generous artists who are willing to share their knowledge. A video on You Tube demonstrates how to make a bicone using a sheet of acrylic, a table, and a round ball of clay. Very cool.


I tried it with a ball of plain clay, then added some design elements: four slices from a leaf cane and some trimmings of my sheet of gold-leaf- on-black clay.


I swirled away, and this was the result.


I liked it, but wished the design had made it's way out to the edges of the bead. I tried again, but used only three slices from the leaf cane.


MUuuuch better!

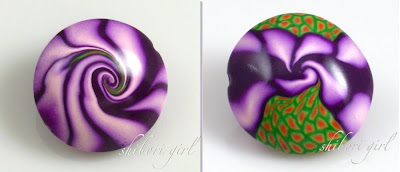
Some photos I'd seen were of bi-colored swirled beads and I tried to do that. I have a flower cane with nice color contrast: green and orange center with purple petals. I covered a ball of clay with two slices from this cane. The mistake I made was to place the ball on the table with the green center facing up. As I swirled, the green disappeared leaving only purple. Pretty, but not what I was after (bead on the left).


I tried again with the green area perpendicular to the table, and "voila!" I stopped swirling a little too soon with the bead on the right, but now I know how to get what I want.

I made some bead sets:


as well as some of the fun-and-funky variety:


These beauties make fabulous focal points for simple necklaces:


Click on above image to see the listing at Etsy

I'll be listing these for sale over the weekend.


Thanks for stopping by. :)

copyright 2010 Shibori Girl

Friday, April 02, 2010

Polymer Clay: Nothing Wasted

I promised a post about what I did with the trimmings from this clay piece. After browsing through Donna Kato's book, I found a great chapter with instructions for what she calls "starry night" canes. She put odds and ends in a food processor and whizzed 'em up until they were tiny pieces. I'm not ready to sacrifice another kitchen appliance to my Clay God, so I used my clay blade to chop mine up.


I've sorted them into color bags, so when I'm ready to make a cane I can pick and choose what goes into it.


Following the instructions outlined in the book, I assembled my chopped pieces of clay into a sheet and rolled it with my brayer.


This melded the sheet together to the point where I could send it through the pasta machine without crumbling.


Cut the sheet in half and stack, send through the machine again. Repeat...The finished cane had wonderful striations, although it didn't look like the samples in the book.


I tried to make a tile cane like the one on this page of Kato's book


and ended with a mess. For some reason, as I reduced my starry night cane, the striations wound up marbling. The directionality was lost.


So, I made a second cane in different colors and assembled a tile cane to resemble a quilt block. I like it!


I left one of the canes intact and used slices to make one half of a lapel pin. The other half of the pin used this wonderful kaleidoscope cane.


Lots of sanding and buffing later, I have two pins I can be proud of.


I used corners from a cane slice to embellish the backside of the pins.


All that's left is to sign the backs and they're done.


copyright 2010 Shibori Girl