I've barely come up for air this week and, alas, have no new recipe to post today. So, I thought I'd share my experience with Penzey's Spice company. How many times have you bought a bottle of herbs or spices at the supermarket? Have you ever wondered how long the bottle has sat on the store shelf? Or how about at the warehouse? Are you really getting what you paid for?
A while ago, Marble Man and I were invited to dinner at a friend's house, where she served a sumptuous meal. She finished up with an apple galette which was incredibly delicious. I was trying to figure out which spices she added to the apples, and got as far as cinnamon. When I asked her what else she added, she insisted it was only cinnamon, and then produced the bottle for me to sniff. Oh, the smell! Rich cinnamon with flowery overtones, and a hint of allspice. This was NOT your generic, McCormick's supermarket cinnamon. She told me that at Penzey's, they bottle the spices up fresh and ship them out, so you get a high-quality product.
She gave me an extra catalog, which I pored over at home. The catalog was very well organized and peppered throughout were recipes and ideas for how to use the products they offer. I proceeded to order spices the way I order beads: some of this, some of that, 4 of these, 2 of those... and before I knew it, I'd spent over $60! When the box arrived, the contents were very carefully wrapped. And when I opened the bottles, they were filled TO THE TOP.
I picked out 4 types of cinnamon, and yes they ARE all very different, as well as herbs and spice blends. The parsley smelled like it had just been picked and dried the week before. And the blends were perfect for use in meats and stews. I threw out a bunch of store-bought bottles from my cabinet that were absolutely dead.
I hope you'll give Penzey's a shot - even with the shipping cost, the prices were competitive with supermarket brands. I will never buy seasonings from the store again, unless I find myself in a desperate situation.
Sunday, July 26, 2009
What's Cooking Sunday / Spices
Friday, July 24, 2009
Bead Embroidery Is My Thing
In my last post, I said I thought my bead embroidered necklace would take a couple of weeks to complete. I forgot to factor in my obsession with fun projects when I made that estimate! I finished the necklace at 1 AM this morning and I'm extremely happy with it.
When I left off at the end of Tuesday's post, I had just decided to embroider the entire piece, not just a centerpiece. I finished that part Wednesday night and went to bed knowing that I'd be doing the finishing work the next day. I hardly slept - I was that excited.
First thing: glue on the backing fabric to cover up all the threads.
This was dry in about 20 minutes - not long at all.
The next order of business was to brick stitch beads one at a time around the edge to attach the edges together. It also makes a nicely finished edge.
As the final step, I encased another muscovite oval bead and attached two hooks to the necklace. One hook is permanently closed, while the other acts as the clasp.
A view of the underside - all the messy threads are nicely hidden.
I love the idea of a focal point at the back. I mean, you want people to be sorry when you leave a room, but you want them to enjoy the view as you go, right?
The entire project, start-to-finish took a whopping 31 hours. And I loved every minute of it!
Click here for purchasing info for this very special necklace...
My beautiful friend, Cissa, as model
When I left off at the end of Tuesday's post, I had just decided to embroider the entire piece, not just a centerpiece. I finished that part Wednesday night and went to bed knowing that I'd be doing the finishing work the next day. I hardly slept - I was that excited.
First thing: glue on the backing fabric to cover up all the threads.
This was dry in about 20 minutes - not long at all.
The next order of business was to brick stitch beads one at a time around the edge to attach the edges together. It also makes a nicely finished edge.
As the final step, I encased another muscovite oval bead and attached two hooks to the necklace. One hook is permanently closed, while the other acts as the clasp.
A view of the underside - all the messy threads are nicely hidden.
I love the idea of a focal point at the back. I mean, you want people to be sorry when you leave a room, but you want them to enjoy the view as you go, right?
The entire project, start-to-finish took a whopping 31 hours. And I loved every minute of it!
Click here for purchasing info for this very special necklace...
Labels:
bead embroidery,
beads,
beadweaving,
fun,
jewelry,
work
Tuesday, July 21, 2009
Work, or Fun... Why Not Both?
When I was growing up, adults would groan and talk about work as a grueling thing to be endured for 8 hours a day. Work was work, then they'd come home and play. I feel lucky to have work and fun... at the same time! Especially these past two months, when I have the time, patience, and supplies at the ready to learn new techniques.
This week's endeavor: bead embroidery. Hot damn... This is seriously fun. I've had this book for about 6 months now.
I take it off the shelf periodically to swoon over the color pictures, but haven't had the time to do something with it until now. Last weekend, as I passed the bookshelf in my studio, there was a pulsing soft yellow glow emanating from the binding of the book, and an electric harmonic in the air, a bit like a wet finger running around the top of a wine glass. I pulled the book down, and it opened on its own to a necklace page. I thought, "why not?" I have a new charoite (SHAR-oh-ITE) oval focal bead from my favorite store and I'd been thinking hard on how to use it.
A beautiful mineral, fairly new to the bead market, charoite comes from Russia. It has layers of color running through it ranging from lavender, pink, brown, and black. Gorgeous!
I anchored the focal bead down, and flanked it with a couple of muscovite ovals for interest. Very pretty!
My original plan was to make a sort of beaded bib which would hang from bead strands. I didn't want to be too ambitious for a first project, but the thing is growing as I work. You can see from the black lines how the design is changing from stage to stage.
Once I had the stones in place, I needed to start filling in the spaces between them with more beads and patterns.
This morning, I changed my mind... again. I decided to go full-hog and make the piece a fully embroidered collar. So, I needed to add some more of the foundation ultra-suede, which will be reinforced in the beading and final construction phase. It'll be just as strong as if it was one piece of cloth.
So far, the piece has taken me 15 hours to get to the stage in the above photo - that's counting all the time to sew stuff down and then take it off again when I don't like it. I think it will probably take me a couple of weeks to finish it. So stay tuned...
Labels:
bead embroidery,
beads,
beadweaving,
fun,
work
Sunday, July 19, 2009
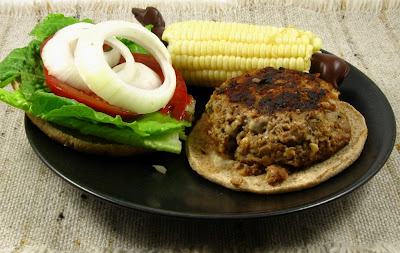
What's Cooking Sunday / Spicy Blue Cheeseburgers
As you can tell from the What's Cooking Recipe list here, Marble Man and I have been trying to pinch pennies and lose weight by concentrating on fish and beans as our main source of protein. Every once in a while, though, my Inner Meatasaurus rears its giant head, gnashes its teeth, and cries out for beef. Last weekend we made hamburgers stuffed with blue cheese, and they satisfied my carnivorous craving to a " T ".
Spicy Blue Cheeseburgers
serves 4
1 lb lean ground beef
1 tsp dried oregano
1/2 tsp ground black pepper
1 tsp dried thyme
1/2 tsp salt
1/2 tsp cayenne pepper
2-3 cloves garlic minced (or more if you like)
1 tsp paprika
1 T lemon juice
1 T Worcestershire sauce
1/2 C rolled oats
1 egg, slightly beaten
1/2 C finely chopped onion
~
1/2 C crumbled blue cheese
In large bowl combine all the above ingredients EXCEPT the blue cheese. Form mixture into 8 equal balls. Flatten them into patties and make a well in the center of four of them. Divide the blue cheese crumbles equally and place in the wells of each patty. Top with the remaining patties and seal the edges well.
Grill or pan-fry, about 4 minutes on each side, until the meat is cooked through and the cheese is nice and melty.
Thursday, July 16, 2009
Bending Mind (And Beads)
Now that I'm able to spend hours at a time in my studio, I am focused on learning more intricate beading techniques long-admired in beading magazines. One of those is the Dutch spiral, a version of peyote stitch but with a technical twist. This results in a wild and organic shape that is visually exciting.
Thanks to my mother's dear friend, Mikkey, an opportunity to learn the Dutch spiral fell into my lap. She sent a necklace kit for me to make up for her. Perfect! The beads were included, as well as wonderfully detailed instructions. I made my way through the pattern, row-by-row. It took me about 5 hours start to finish, which I think was pretty good time.
Now, I've made three more, using my own beads and I've whittled the time down to 4 hours. This first one came out quite knobbly because I experimented with bead size. In additional to #11 seed beads, I added #15's and #13 charlottes. Using such tiny components tightened up the spirals, which is interesting to look at, but I liked the gentler twists of the original necklace better.
This blue version went back to #11 seed beads, and I added some deep iridescent fringe beads, which poke out of the design. Wonderful textural interest there!
More experimenting with color here: Reds, lavender, brown, green, and gold.
The ends of the rat-tail cord are embellished with tubular peyote stitch "cuffs" and beautiful art-glass button closures.
The original pattern had the bead embellishment as individually stitched parallel circles of beads. I didn't love this finishing method - the rows didn't nestle together neatly, and it took much longer to do than the peyote stitched ones I did later on.
These three necklaces are available through my Etsy shop - click on the pictures to view the individual listings. I'm hoping these will take off as they are a lot of fun to make!
Working with this new technique had me singing this fantastic song by Lambert, Hendricks, and Ross as I stitched...
As I watched this, I wondered, "So WHEN does she get to take a breath?!?" Amazing phrasing there...
Thanks to my mother's dear friend, Mikkey, an opportunity to learn the Dutch spiral fell into my lap. She sent a necklace kit for me to make up for her. Perfect! The beads were included, as well as wonderfully detailed instructions. I made my way through the pattern, row-by-row. It took me about 5 hours start to finish, which I think was pretty good time.
Now, I've made three more, using my own beads and I've whittled the time down to 4 hours. This first one came out quite knobbly because I experimented with bead size. In additional to #11 seed beads, I added #15's and #13 charlottes. Using such tiny components tightened up the spirals, which is interesting to look at, but I liked the gentler twists of the original necklace better.
This blue version went back to #11 seed beads, and I added some deep iridescent fringe beads, which poke out of the design. Wonderful textural interest there!
More experimenting with color here: Reds, lavender, brown, green, and gold.
The ends of the rat-tail cord are embellished with tubular peyote stitch "cuffs" and beautiful art-glass button closures.
The original pattern had the bead embellishment as individually stitched parallel circles of beads. I didn't love this finishing method - the rows didn't nestle together neatly, and it took much longer to do than the peyote stitched ones I did later on.
These three necklaces are available through my Etsy shop - click on the pictures to view the individual listings. I'm hoping these will take off as they are a lot of fun to make!
Working with this new technique had me singing this fantastic song by Lambert, Hendricks, and Ross as I stitched...
As I watched this, I wondered, "So WHEN does she get to take a breath?!?" Amazing phrasing there...
Labels:
beads,
beadweaving,
etsy.com,
jewelry,
music,
peyote stitch,
work
Monday, July 13, 2009
I Want To Be Shirley Bassey
I've been rediscovering the music of Dame Shirley Bassey. Her powerful and sassy voice lends itself well to jazz and pop, and it's a great sound to work to as I bead in the studio. At the age of 72, she's still belting out beautiful noise, AND she looks both sexy and badass while she does it! I want to be her...
Everybody knows her version of the James Bond Goldfinger lead-in song, but there are so many others too. Like "History Repeating" which she recorded with The Propellerheads back in 1997. This video has an old-timey British feel to it...
Then there's her version of "Let's Get The Party Started"...
The hauntingly beautiful "Without A Word"...
Her wonderful sense of humor comes through in her live performance of "Something" by George Harrison...
She can serenade me anytime.
Sunday, July 12, 2009
What's Cooking Sunday / Spicy Gingerbread
"If loving you is wrong, I don't want to be right..."
My long-running love affair with dessert continues, and brings to mind that song by Luther Ingram from 1972. While Marble Man and I have been back on our diets, we've tried to keep sweets out of the house, and I just couldn't do it. The past two days I've been Jonesing for a little Somethin'-Somethin' to feed my craving. A fresh batch of gingerbread yesterday did the trick: moist, spicy, and slightly sweet. The recipe I use is from The Enchanted Broccoli Forest cookbook, by Molly Katzen. It calls for lots of freshly grated ginger, and this is key - don't substitute ground ginger as it won't have the same kick.
Spicy Gingerbread
Serves 12
preheat oven 350 degrees
5 T unsalted butter
3 T freshly grated ginger
1/2 C light honey
1/2 C light molasses
1/2 C plain yogurt
1 large egg
1 C whole wheat flour
1 C unbleached white flour
1 1/2 tsp baking soda
1/4 tsp salt
1 tsp dry mustard
1/2 tsp ground cloves or allspice
1/4 tsp nutmeg
Saute the butter and ginger together light, about 3-4 minutes. Remove from heat.
Beat the honey and molasses together vigorously for 5 minutes. Then beat in the ginger plus all of its butter.
Beat the yogurt and the egg together well. Combine with the above mixture and set aside.
Sift together the remaining ingredients thoroughly into a large mixing bowl. Make a well in the center of the dry mixture. Add the wet mixture. Combine thoroughly, but minimally. Spread the batter into an 8" square pan sprayed with non-stick spray. Bake 30-35 minutes. It's done when the top is springy to the touch, or when a toothpick inserted in the center comes out clean.
Saturday, July 11, 2009
"And the Award Goes To..."
Thanks to Brenda from Fallen Angel Designs for bestowing upon me this award
I really can't think of just 15 people to pass this onto, so I'm awarding it to everyone in my blogroll lists. I mean, y'all wouldn't be in those lists if I didn't think your blogs are lovely! If you want to pass it on to others, here are
THE RULES:
1. Accept the award.
2. Post it on your blog together with the name of the person who has granted the award, along with his or her blog link.
3. Pass the award to 15 other blogs that you have newly discovered. Remember to contact the bloggers to let them know they have been chosen for this award.
Be sure to visit Fallen Angel Designs to see her beautiful, romantic jewelry.
Tuesday, July 07, 2009
Focusing on Finishing
I'm in a beadweaving frame of mind. Now that I've finished Mikkey's amulet bag, I feel quite free to work on some inspirational pieces. My time is spent in the studio, wearing my work station close-up glasses and under the magnifier as I peer at tiny seed beads. The first piece finished last week was this necklace based on the one featured on the cover of the February 2009 issue of Bead & Button Magazine and designed by Marcia DeCoster:
This was a great instructional project. I learned a new way to do decreasing flat peyote stitch, as well as Ndebele (en-DEB-el-AH), or tubular herringbone, stitch. I've also been itching to practice encasing focal beads with peyote stitch bezels. This one turned out to be a beauty.
The necklace rope called for twisted Ndebele.
The final product looks like individual strands of seed beads that were twisted before wearing, but the pattern is woven into a permanently twisted design. The wearer never has to think about pre-twisting before donning the necklace. Sweet! The connecting loops were made with straight Ndebele. The finishing touch is a sterling silver box clasp with a purple glass cabachon.
There was a lot to learn, and lots of practice with each component of the piece. There was also a lot of undoing mistakes!
A spectacular moukite oval bead is the focal point, with a deep, rusty red background and ribbons of yellow, cream, gray, and lavender running through it. The stone is surrounded by a seed bead bezel embellished with micro-faceted sunstone rondelles and keishi pearls. The beads are stitched to a soft, eggplant purple Ultrasuede background fabric - something else I've been wanting to learn for a very long time.
The rope from which the pendant hangs was woven with the twisted Ndebele stitch. The rope colors are a deep cherry red accented with a line of metallic beads ranging from deep gold to purple. The ends of the necklace are embellished with hand stitched beaded bead caps, moukite round beads, and Czech fire-polished crystal beads.
This was a great instructional project. I learned a new way to do decreasing flat peyote stitch, as well as Ndebele (en-DEB-el-AH), or tubular herringbone, stitch. I've also been itching to practice encasing focal beads with peyote stitch bezels. This one turned out to be a beauty.
The central stone is agatized fossil coral, surrounded with cafe au lait-colored faux pearls and keishi pearls. The drop is peach-colored cubic zirconium. I'm very pleased with the final result. The beads were stitched down to a peyote stitch base, which made a nice, elegant finish.
The necklace rope called for twisted Ndebele.
The final product looks like individual strands of seed beads that were twisted before wearing, but the pattern is woven into a permanently twisted design. The wearer never has to think about pre-twisting before donning the necklace. Sweet! The connecting loops were made with straight Ndebele. The finishing touch is a sterling silver box clasp with a purple glass cabachon.
There was a lot to learn, and lots of practice with each component of the piece. There was also a lot of undoing mistakes!
~~~
The other piece I finished was my own design.
A spectacular moukite oval bead is the focal point, with a deep, rusty red background and ribbons of yellow, cream, gray, and lavender running through it. The stone is surrounded by a seed bead bezel embellished with micro-faceted sunstone rondelles and keishi pearls. The beads are stitched to a soft, eggplant purple Ultrasuede background fabric - something else I've been wanting to learn for a very long time.
The rope from which the pendant hangs was woven with the twisted Ndebele stitch. The rope colors are a deep cherry red accented with a line of metallic beads ranging from deep gold to purple. The ends of the necklace are embellished with hand stitched beaded bead caps, moukite round beads, and Czech fire-polished crystal beads.
Those beaded bead caps were F - U - N, fun!
Purchasing information for this piece can be found here.
Labels:
bead embroidery,
beads,
beadweaving,
etsy.com,
fun,
jewelry,
peyote stitch,
work
Sunday, July 05, 2009
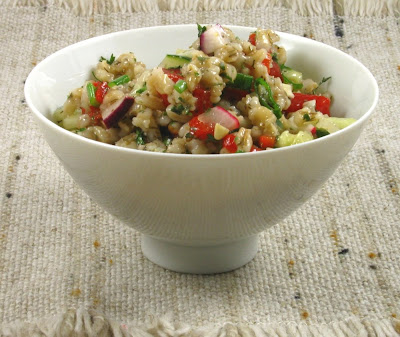
What's Cooking Sunday / Barley Salad Vinaigrette
This being July 4th weekend, there are a lot of pot luck parties going on. I've found it very difficult to eat a balanced meal at this kind of party, with available dishes loaded with heavy fats and proteins, or an abundance of desserts. This barley salad tastes great and is loaded with fiber.
Barley Salad Vinaigrette
Serves 4
2 C cooked pearled barley, cooled
1/2 C seeded and diced cucumber
1/4 C each diced red pepper and scallion
2 T chopped radish
1 T each chopped parsley and dill
2 T red vinegar
4 tsp olive oil
1 T water
1/2 tsp Dijon mustard
1/4 tsp salt
1/8 tsp ground black pepper
4 C shredded lettuce
In medium bowl, combine barley, cucumber, bell pepper, scallion, radish, parsley and dill. Set aside.
In small bowl, combine remaining ingredients except the lettuce. Stir well. Pour over barley mixture. Toss to coat. Serve over lettuce.
This is sure to be a big hit at your next potluck: not only tasty, but good for you and pretty to look at on the plate. Enjoy!
Subscribe to:
Posts (Atom)