Last week, while Marble Man was off, sunning himself at the beach, I was at home dogsitting and spending a LOT of time online. I came across several blogs talking about light tents and light boxes. Hazaah! This is what I need. I Googled "light box" and found several nice ones, but, hey... they're really expensive! By the time I bought the tent, the lights, and a background sweep, I could expect to spend about $300. Then, I came upon a blog with a tutorial on how to make one myself out of an old box and some tissue paper. This is exciting. I have a box. And paper, and tape. OK, let's get started! There were some things about the design I didn't want, so I changed it a bit to suit my needs:
I would use a box that is at least 12" square. We're going to cut five sides out of the box, and leave one side intact as the base.
Measure 2" in from each corner and draw a line with a sharpie pen.
Then, with a box cutter, cut along the lines. PLEASE be careful - we don't want any accidental appendectomies or amputations.
Now tape white tissue paper on the outside of the box over four of the cut-out sides. One side remains open for the camera.
Finally, you will need a piece of white (or black) poster board, or bristol board for the back sweep. This creates a nice seamless picture with graduated shadows. You want it to start at the upper back corner and finish in the lower front corner. (I couldn't find a piece big enough to reach both corners, so I "made do" with a smaller piece for now. I'll replace it with a bigger one later.)
The other thing to consider is lighting. I tried using floodlights with regular incandescent bulbs. As you can see below, this was a mistake. The result was dim with a dark yellow cast. So, I broke down and ordered some special floods with tripod stands and tungsten bulbs. Wowie, zowie. Perfection!
Here's the finished setup:
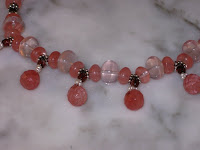
Final result with camera set on "macro" and a light on each side of the box, pointing down through the tissue paper:


12 comments:
How cool! I'm going to have to make myself one. I too struggling with the lighting issues and don't want to loosen my purse strings for expensive equipment. Thanks for sharing the details.
Brilliant! Thank you for sharing the details and taking us thru it step by step. I found you thru Constance. Glad I did!
NO WAY! How cool, thanks so much for sharing! I might have to attempt one of these myself. You gave great instruction :)
This is really interesting that you posted this because just yesterday my husband made a light box. He made it from pine wood(we already had it) and painted it white. BUT seeing this and remembering other tutorials I've seen he's going to cut out the two sides. I don't think the back needs a cut out from the one I saw (but we'll see). I will then use plain white cotton fabric to cover the top and the 2 side openings. AND due to my reading your post and worrying this weekend about lighting......I ordered those lamps you linked. I am really anxious to get this RIGHT so I can properly photograph my art and especially the art dolls.
That was a great example of a before and after photo you posted.
Thanks so much Kate, we were definitely on the same wavelength!
Hugs, Lisa
This is great Shibori Girl!
My friend and I bought light~box, But didn't work as well as yours! Marble man and you are a great team.
Hope all is well in photo~Land!
xo
Constance
This is brilliant Kate! Thank you for sharing this method!!
Nancy
man!
i really love your
*go for it*
attitude!
:-)
you see it
you want it
YOU DO IT
you rock, missy!
that is sooo awesome! Thanks for the tutorial ... me thinks I have something to add to the honey-do list. :)
Perfection for sure!
Lisa sent me over to have a look!
Thank you for sharing! What a difference it makes in phtographing your art!
That looks simple--thanks for the tips :)
Thanks for sharing how you made your light tent. I was looking at buying one but am inspired by this to make one instead. I have shared a link to this post on my blog, I hope you don't mind.
Cara
very clever this idea Kate, thank you for sharing , i try to make one too!
Post a Comment